







Herringbone Flooring has become one of Melbourne’s most iconic interior design choices thanks to its sophistication, geometric rhythm, and timeless visual appeal. Whether you’re refreshing a single room or upgrading your entire home, understanding how to install herringbone flooring is essential for achieving a flawless, designer-standard finish. This comprehensive guide is tailored for Arta Floor customers across Melbourne, offering practical steps, expert layout techniques, subfloor preparation tips, and installation advice suitable for modern Australian homes.
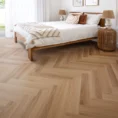
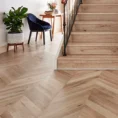
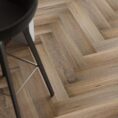
Herringbone flooring consists of rectangular boards arranged at 90-degree angles to create a broken zig-zag pattern. Unlike straight-lay installations, herringbone is highly pattern-dependent, meaning accuracy is critical. This style enhances visual depth, adds movement to open-plan spaces, and elevates homes with a high-end architectural feel.
Key benefits include:
To begin your installation with confidence, prepare the following tools:
Each tool contributes to maintaining alignment, accuracy, and pattern consistency.

Correct preparation is critical for long-term performance.
Dust, grit, and debris affect both adhesive performance and locking mechanisms. Begin with a full vacuum.
Herringbone patterns expose even the smallest imperfections. Concrete should be levelled using a smoothing compound, while timber subfloors must be secure, stable, and free from movement.
All subfloors must pass moisture requirements. High moisture can affect stability and long-term performance.

This is the most crucial step in the installation process.
Use a chalk line or laser to locate the centre of the room. This ensures the pattern remains symmetrical.
This marks where the first pieces will meet at perfect 90-degree angles.
Dry-fitting helps confirm pattern direction, colour variation, and visual alignment.

Follow this structured sequence for a professional result.
Place two boards in a perfect V-shape on the reference lines. This sets the geometry for the entire room.
Add planks sequentially, tapping gently into place while checking alignment.
Use spacers around the room perimeter to allow natural expansion.
Depending on board type:
Use a mitre saw or jigsaw for angled cuts along walls and corners.
If misalignment occurs early and is not corrected, the error increases across the room.
Borders add an elegant frame that highlights the pattern.
Steps:
Borders are popular in hallways, living areas, and open-plan designs.
Yes—many engineered flooring products are versatile enough to be installed as a traditional straight lay. However, most homeowners choose herringbone specifically for its decorative effect.
Herringbone requires greater attention to detail due to pattern alignment and geometric precision. While experienced DIY installers may manage it, many Melbourne homeowners prefer professional installation to ensure:
Proper set-out is the foundation of a clean installation:
When installing floating herringbone flooring, choose an underlay that provides:
High-density underlay works best for premium finishes.

Avoiding these issues prevents long-term structural problems.
| Subfloor Type | Suitable? | Notes |
| Concrete | Yes | Must be level, dry, and prepared |
| Timber | Yes | Ensure boards are secure with no movement |
| Tiles | Sometimes | Tiles must be flat and fully bonded |
| Carpet | No | Must be removed before installation |
Start at the centre, position starter boards precisely, and work outward while maintaining pattern symmetry.
It requires accuracy, so beginners may find straight-lay flooring easier.
Yes—this method is common in high-traffic areas and larger rooms.
Absolutely. Borders add structure and elegance.
Living rooms, hallways, kitchens, and larger open spaces.
Transform your home with expert-installed herringbone flooring. Arta Floor offers premium flooring options, design guidance, and installation support for homeowners across Melbourne. Whether you’re updating a single room or enhancing your entire living space, our team is ready to help you achieve a flawless, long-lasting finish.